
How to Repair a Broken Laptop Screen — A Step-by-Step Guide
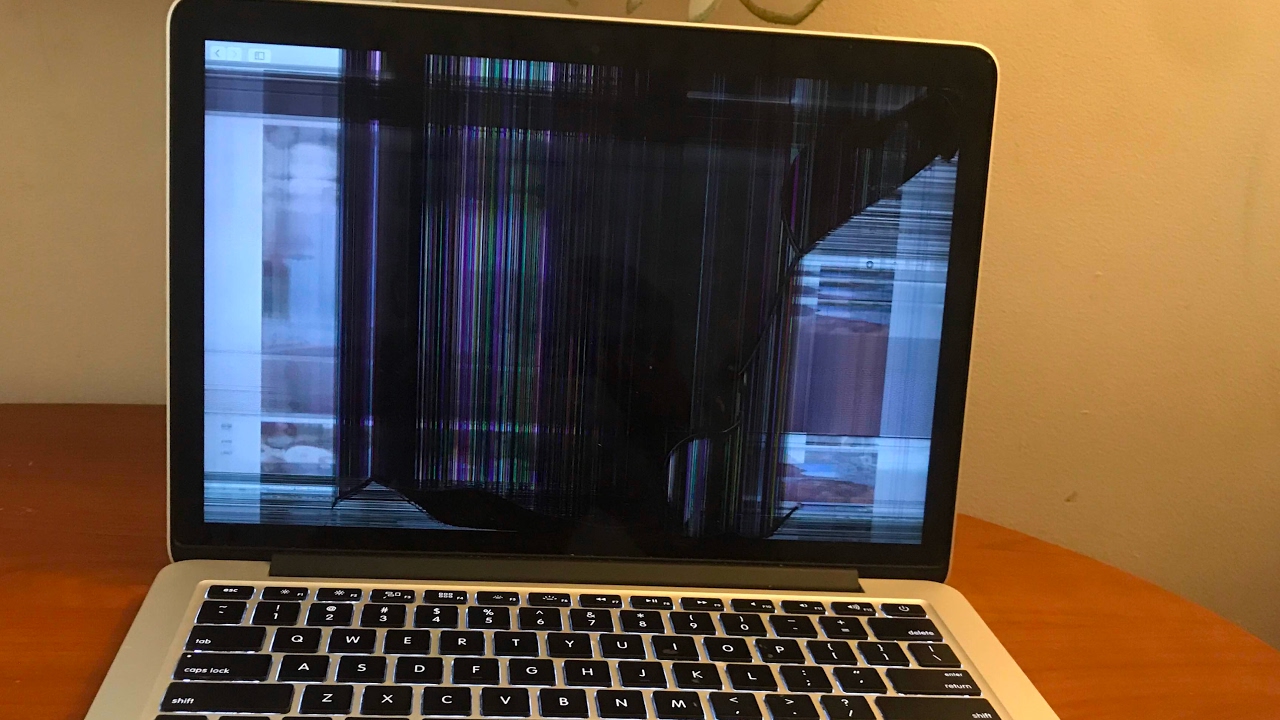
You will notice various visual defects when your Windows or Mac laptop’s screen breaks. Dead or stuck pixels might appear on the display when using the device. Discolouration is another problem that you might encounter due to a cracked screen. Besides, the laptop screen might appear black or not turn on at all for this issue.
The screen is the most vulnerable to damage out of all the laptop units. It can stop working after an accidental menace or liquid spill. Disconnect the power sources from the laptop if you notice a black or white screen. Press the “power” button after a few seconds and replace the screen if the device fails to turn on.
Now, let’s get to know the reasons for a broken laptop screen and how can you fix it:
What Causes the Laptop Screen to Malfunction or be Broken?
Physical damage is the most common reason behind a broken laptop screen. The LED display might get cracked if the laptop falls from a high distance. Moreover, if you accidentally drop a heavy object over the screen, it will gradually break.
A Windows or Mac screen can even break due to the following reasons:
- Malfunctioning backlight
- Cable and connector issues
- Out-of-date graphics driver
- Screen burn
- Age
How to Repair a Broken Windows Laptop Screen?
You must try out a few D-I-Y fixes before replacing or repairing the Windows laptop screen. If the laptop’s screen is physically cracked and the underlying panel is damaged, these solutions won’t work. However, there is no need to replace the screen if it has minor cracks and is working properly.
Implement these solutions to fix the broken laptop screen:
- Reboot the Windows Computer
The screen might not work due to an issue with the Windows operating system. Restarting the device might fix this software glitch. Tap on the “Start” icon and choose the “Power” option when the pop-up window opens. Select “Shut Down” from the drop-down list to turn off the Windows device.
Additionally, you can press the Alt and F4 keys together and select “Shut Down”. Wait until the laptop screen turns black. Press the “Power” button after at least 3-4 minutes and check if the screen is working. If the error persists, the laptop screen might be faulty or damaged.
- Examine the Laptop
Turn off the Windows laptop if the screen is working. After that, close the device’s lid and reopen it after a few minutes. Check whether there is any dust or debris in the screen and keyboard areas. If yes, clean these two laptop units thoroughly.
The latest Windows 10/11 laptops come with a visible latch. This latch can get contaminated over time due to improper maintenance. Clean the latch mechanism and lock it securely afterwards. Restart the Windows computer and check if the screen is turning on or not.
Did you install a new screen recently on the device? Then the problem lies with the lid sensor, not on the screen. Replace the lid sensor in such instances to fix the screen glitch. Contact a technician if the screen is not working even after fixing the lid sensor.
- Update the Graphics Card Driver
Try updating the graphics card driver if the screen isn’t completely black. Press the Windows and X keys together and select “Device Manager” from the pop-up menu. Additionally, you can press the Windows and R keys together.
Wait until the dialogue box appears and write “devmgmt.msc”. Hit the Enter button to access the Device Manager tool. Double-tap on “Display Adapters” and choose the correct graphs driver from the list. Right-click on it and tap on “Update Driver” from the pop-up menu.
Click “Search automatically for drivers” when the next window opens. Windows will then search for the compatible graphics driver and install it. Restart the laptop when the driver installation is complete. The laptop screen might work after updating the current graphics card driver.
- Remove the Stuck Pixels from the Screen
The Windows laptop screen might appear black due to stuck pixels. Thus, try to remove them to resolve this complicated problem. There are many pixel-removal programs available for Windows laptops. However, these apps might not provide guaranteed results.
Many users have removed the stuck pixels from the display using the pressure method. First, you must find where the pixels are located on the screen areas. Use a narrow object with a blunt and dull end to tap on the stuck pixel.
Don’t exert excess pressure while removing the pixels. It could cause severe damage to the Windows laptop screen. Did you see a white glow on the display? It indicates the stuck pixels are removed from the screen. However, if you didn’t notice a white glow, you haven’t tapped hard enough. Increase the pressure on the screen to completely remove the stuck pixels.
- Fix the Screen Burn-Ins
The high screen brightness level can cause burn-in in the Windows laptop screen. Thus, try to adjust the Windows laptop’s screen brightness to fix the issue. Press the Windows and I keys together to open the Settings app. Tap on “Display” and head towards “Brightness” when the next screen appears.
Keep the maximum brightness level within 30-33. Close the Settings window and restart the Windows laptop after a few minutes. If the burn-in issue is still there, then something is wrong with the laptop screen. You need to replace the screen immediately to eliminate this technical glitch.
- Check the Screen and Backlight Connections
If you have experience in disassembling the laptop parts, remove the bezel around the screen. After that, unmount the screws and remove the hinge covers. Take out the screen and check the backlight wires and connectors.
If you find any wear and tear in these wires or connectors, replace them immediately. Is the laptop displaying a black screen even after changing the backlight units? Then the problem lies in the laptop’s LED or OLED display. You can’t access the device without repairing the screen.
- Replace the Faulty Screen
Consider replacing the existing laptop screen if any D-I-Y solution didn’t work. However, you will need tools like screwdrivers and a pair of tweezers to remove the screen. A thin metal blade and a plastic spudger might be required for the screen replacement.
Once you assemble the required tools, follow these steps to replace the laptop screen:
Disconnect the Power Resources from the Laptop
Place the Windows laptop on a flat and clean surface. Unplug the charging and USB cable from the device. Turn off the laptop and unmount the screws from the battery’s panel. Remove the battery and keep it in a safe location.
Use a flat-headed screwdriver to remove the device’s bezel screws. There might be at least 4-6 bezel screws in the Windows laptop. After removing all of them, put them in a plastic bag or bowl with rubber covers.
Remove the Bezel
Place your fingers at the Windows laptop screen’s bottom centre. Gently slide the finder between the bezel and the screen. Pull the bezel to remove it from the laptop panel. If the bezel is not coming out, try pulling it in the opposite direction until it becomes loose.
Remove the Screws holding the Laptop’s Screen
Most advanced Windows laptops have LCDs that are mounted under the removable bezel. Use a small screwdriver to unmount these screws from the LCD panel. After that, remove the screws that connect the screen to the keyboard. Be careful not to damage the video wire while removing these units.
Unplug the Video Connector Wire
Locate where the Windows laptop’s video cable is installed. It is a white long wire which is usually taped to the screen’s backside. You must lift the tape with a spudger and disconnect it from the video cable.
Some high-end laptops might have two separate video cables connected to the LCD. Try to remove both of them using a puffy knife. Don’t remove or unplug the tap from the screen, otherwise you might experience issues placing the connector to the back of the new LCD.
Install the New Laptop Screen
Place the replacement screen flat on the laptop keyboard. This will make it easier to connect the video connector to the new LCD. Plug the video cable into the screen’s backside and put adhesive tape on the connector. Mount the screws on the LCD panel using a flat-headed screwdriver.
Reattach the bezel to the screen and put the battery back into the laptop. Plugin the power adapter into the device’s charging port. Press and hold the “Power” button until the laptop screen turns on. Check if there is any blurry line, cracks or distorted images on the screen. If not, then you have successfully reinstalled the new screen on your laptop.
Contact Tech Support Dubai to Repair the Broken Laptop Screen!
Replacing a broken MacBook screen might be more difficult than repairing a Windows laptop screen. This is why you should hire Tech Support Dubai technicians for an instant fix. They are backed by certified and experienced laptop repair experts. So connect with them and repair the broken laptop screen by spending a few AEDs.